Posts Tagged ‘Exchange 2007’
Exchange 2007: OWA Themes Selection
End-user can choose the OWA appearance from 4 different themes available by default in Exchange 2007 SP1.
Users need to go to, Options –> General Settings –> Appearance –> Select Anyone…
- Seattle Sky (Default OWA Theme)
- Carbon Black
- Xbox®
- Zune™

Q: What to do if this option is not visible in OWA?
A: This options is visible only if ThemeSelectionEnabled option enabled on OWA virtual directory. You can verify it with below cmdlet.
Get-OwaVirtualDirectory "owa (default web site)" | FL Name, ThemeSelectionEnabled

If value of ThemeSelectionEnable option shows False, you can set it to true with below cmdlet.
Set-OwaVirtualDirectory "owa (default web site)" –ThemeSelectionEnabled $True
Q: What to do if you want to force anyone of the theme globally for all users?
A: You can set the theme globally for all users with “DefaultTheme” parameter of Set-OwaVirtualDirectory cmdlet.
Question is how do we give the name of theme since powershell doesn’t support special character available in the name of themes, like Xbox® & Zune™. Instead of giving name of theme we can give the directory name of the theme where the files of a theme are located.
You can find all theme directories at “C:\Program Files\Microsoft\Exchange Server\ClientAccess\Owa\8.1.xxx.x\themes” (where xxx.x differs based on the SP & UR installed).
| Directory Name | Theme |
| Base | Seattle Sky |
| 1 | Carbon Black |
| 2 | Xbox® |
| 3 | Zune™ |
So we can pass the directory name in the “DefaultTheme” parameter of Set-OwaVirtualDirectory cmdlet to select the default theme globally. To select Xbox theme globally we can run below cmdlet and restart the IIS service to make it effective.
Set-OwaVirtualDirectory "owa (default web site)" -DefaultTheme 2 -ThemeSelectionEnabled $False
IISReset /NoForce

Q: What happens if we don’t disable Theme Selection while setting up specific theme globally?
A: You would have seen that I added a parameter “ThemeSelectionEnabled” with value $False to disable Theme Selection while setting up OWA theme globally.
If ThemeSelectionEnable option is set to $True while setting up OWA theme globally, it applies only on the users who login first time in OWA, and for the users who have already login, don’t see new theme applied and they need to choose from Options –> General Settings manually.
But ThemeSelectionEnable optionis set to $False, new theme applies to all users in the organization.
Default OWA Themes
 |
 |
 |
 |
|
Seattle Sky |
Carbon Black |
Xbox® |
Zune™ |
Exchange 2007: Database Statistics in Powershell
![]() Many times we need to find number of mailboxes in each database and the size of the database (EDB file) of all servers in an Exchange 2007 environment. With PowerShell, it is fairly simple to grab in a single line.
Many times we need to find number of mailboxes in each database and the size of the database (EDB file) of all servers in an Exchange 2007 environment. With PowerShell, it is fairly simple to grab in a single line.
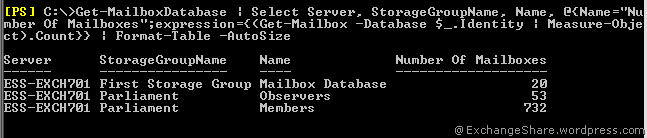
1. How do we find number of mailboxes in each database?
On Screen: Get-MailboxDatabase | Select Server, StorageGroupName, Name, @{Name="Number Of Mailboxes";expression={(Get-Mailbox -Database $_.Identity | Measure-Object).Count}} | Format-Table -AutoSize
Export to CSV: Get-MailboxDatabase | Select Server, StorageGroupName, Name, @{Name="Number Of Mailboxes";expression={(Get-Mailbox -Database $_.Identity | Measure-Object).Count}} | Export-Csv C:\ServerStat-1.csv
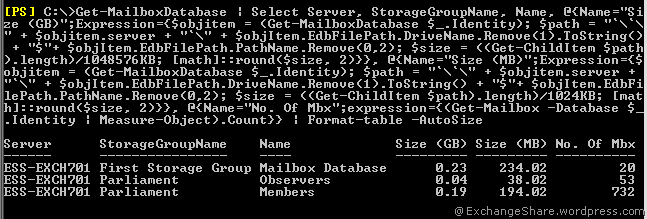
2. How do we find number of mailboxes and size of EDB file for each Database?
On Screen: Get-MailboxDatabase | Select Server, StorageGroupName, Name, @{Name="Size (GB)";Expression={$objitem = (Get-MailboxDatabase $_.Identity); $path = "`\`\" + $objitem.server + "`\" + $objItem.EdbFilePath.DriveName.Remove(1).ToString() + "$"+ $objItem.EdbFilePath.PathName.Remove(0,2); $size = ((Get-ChildItem $path).length)/1048576KB; [math]::round($size, 2)}}, @{Name="Size (MB)";Expression={$objitem = (Get-MailboxDatabase $_.Identity); $path = "`\`\" + $objitem.server + "`\" + $objItem.EdbFilePath.DriveName.Remove(1).ToString() + "$"+ $objItem.EdbFilePath.PathName.Remove(0,2); $size = ((Get-ChildItem $path).length)/1024KB; [math]::round($size, 2)}}, @{Name="No. Of Mbx";expression={(Get-Mailbox -Database $_.Identity | Measure-Object).Count}} | Format-table -AutoSize
Export to CSV: Get-MailboxDatabase | Select Server, StorageGroupName, Name, @{Name="Size (GB)";Expression={$objitem = (Get-MailboxDatabase $_.Identity); $path = "`\`\" + $objitem.server + "`\" + $objItem.EdbFilePath.DriveName.Remove(1).ToString() + "$"+ $objItem.EdbFilePath.PathName.Remove(0,2); $size = ((Get-ChildItem $path).length)/1048576KB; [math]::round($size, 2)}}, @{Name="Size (MB)";Expression={$objitem = (Get-MailboxDatabase $_.Identity); $path = "`\`\" + $objitem.server + "`\" + $objItem.EdbFilePath.DriveName.Remove(1).ToString() + "$"+ $objItem.EdbFilePath.PathName.Remove(0,2); $size = ((Get-ChildItem $path).length)/1024KB; [math]::round($size, 2)}}, @{Name="No. Of Mbx";expression={(Get-Mailbox -Database $_.Identity | Measure-Object).Count}} | Export-CSV C:\ServerStat-2.csv
Shared Mailbox added in outlook profile but, where will Sent Item be saved?
![]() There is a common query across everywhere, when we add a shared mailbox in outlook profile and sending a mail from that account (using Send-As or Send On Behalf of) by specifying it in From field, mail item will be saved into ‘Sent Item’ of primary mailbox instead of ‘Sent Item’ folder of shared mailbox as per normal behaviour of Outlook.
There is a common query across everywhere, when we add a shared mailbox in outlook profile and sending a mail from that account (using Send-As or Send On Behalf of) by specifying it in From field, mail item will be saved into ‘Sent Item’ of primary mailbox instead of ‘Sent Item’ folder of shared mailbox as per normal behaviour of Outlook.
Something like when I opened ‘Support’ mailbox in my outlook profile as an additional mailbox and sending mail from ‘Support’ mailbox by specifying it into From field. It will be saved into ‘Sent Item’ of Amit Tank’s mailbox and not in Sent Item of ‘Support’ mailbox.!!

So how do we configure it to be saved into Sent Item of Shared mailbox by default? So far we had to use some third-party utility like IvaSoft Unisent but now Microsoft has given an easy solution for it.
Solution:
Outlook 2007: Microsoft has released an Outlook 2007 hotfix package dated June 30, 2009 to resolve certain issues and this issue is addressed in that list.
So Install this hotfix package and add a registry key to make it enable.
1. Hotfix: Description of the Outlook 2007 hotfix package (Outlook.msp): June 30, 2009
2. Set below registry key as per KB972148 to enable this functionality.
[HKEY_CURRENT_USER\Software\Microsoft\Office\12.0\Outlook\Preferences]
"DelegateSentItemsStyle"=dword:00000001
Voila! Now all mails, sent from shared mailbox account, are being saved into ‘Sent Item’ of shared mailbox.

Update:
Outlook 2003: Similar hotfix KB953803 requires to be installed for Outlook 2003 and add the registry key mentioned in KB953804 to enable this functionality.
How to: Setup Read Only Mailbox in Exchange 2003/2007
 This is frequently asked question, “How to setup Read-only Mailbox?” or “How to give Read-Only permission to access mailbox?” in Exchange 2003/2007. Procedure is tricky but moderately possible.
We have two places where we can give minimum permission to access any mailbox. Refer below article at MS Exchange Team blog for more details.
Minimum permissions necessary to access mailbox data
- Active Directory Mailbox ACLs – Full Mailbox Permission requires in the mailbox ACLs at Active Directory level to access mails, so this is not correct place where we can configure Read-Only permission.
- MAPI Folder Permissions – This is the correct place for our requirement. Let’s discuss how to do so.
As always let’s take an example. I am owner of mailbox called “Support” mailbox and I have Full Mailbox Access on it. Now I want to share Support mailbox with any user or a set of users (in from of group) but as a Read-Only and don’t want to allow them deleting any items inside.
If you are selecting a group to configure permission then it should be Mail Enabled Security group. If you are using distribution group to assign permission then it gives you an error while assigning permission in Outlook. It is always recommended to use security group while assigning permissions.
Let’s say I am going use “#Support Team” Mail Enabled Security group to assigned read only permission on “Support” mailbox hence member of “#Support Team” will be able to open it.


Now to open any mailbox and view all folders inside it, we need to give MAPI permission starting from Top of the Mailbox object “Mailbox – <Mailbox Display Name>” in Outlook.
1. Right Click on “Mailbox – Support” and click “Change Sharing Permission…” (“Sharing…” if you are using Outlook 2003).

2. Click on Add and select “#Support Team” from GAL, give at least “Folder
Visible” (or you can also give Reviewer) permission to view all mailbox folders.

3. Now, Right click on “Inbox” and click on “Change Sharing Permission…” or “Sharing…”.

4. Click “Add” and select the “#Support Team” from GAL and give “Reviewer” permission.

Follow step 3 & 4 for all folders which you want to share with group.
Sheldon Labrooy is one of the member of “#Support Team”.

So Sheldon can add “Support” mailbox into Outlook profile by going to Tools –> Account Settings –> Change Email Account –> More Settings –> Advance Tab –> Click Add in “Mailboxes – Open these additional Mailboxes:” and select Support mailbox.


Sheldon can see all items available in Support mailbox and he will be able to Reply or Forward.

But he is not allowed to Delete or Move any items in it.

Its pretty simple to add and open any mailbox in Outlook but how to open it in OWA? Reason is OWA requires Full Mailbox access to open full content of OWA site, otherwise it gives an error telling that you don’t have permission to access mailbox, so what you can do in Read-Only mailbox case?
Sometime back I discussed how to open shared calendar in OWA and user can use same method here to open “Inbox” of any read only mailbox.
User can use below direct links for respective folders and give their own user id and password to open it in OWA.
| Inbox | https://<FQDN of server>/owa/<smtpaddress>/?cmd=contents |
| Subfolder of Inbox | https://<FQDN of server>/owa/<smtpaddress>/?cmd=contents&f=inbox%2fSubFolder |
| Calendar | https://<FQDN of server>/owa/<smtpaddress>/?cmd=contents&module=calendar |
| Contacts | https://<FQDN of server>/owa/<smtpaddress>/?cmd=contents&module=Contacts |
| Tasks | https://<FQDN of server>/owa/<smtpaddress>/?cmd=contents&module=Tasks |

Exchange 2010: ‘Send As’ and ‘Send on Behalf Of’ in OWA

As we know Exchange 2010 is coming with many wonderful new and improved features. Let me demonstrate one of the long awaited feature, “Send-As” or “Send on Behalf Of” in OWA..!!!
Before going forward, let me show you how to enable BCC and From fields in options.
Go to Options –> Settings –> Mail –> Message format and enable below option “Always Show From” and also if you want enable Bcc field to available always by default, select “Always Show Bcc”.

Yes, that’s true now you can keep Bcc option enabled by default in Exchange 2010 as opposed to enabling every time from “Options” while drafting a new mail in Exchange 2007 (however there is a workaround to keep it enabled by default in Exchange 2007).
Back to main topic, when you draft a new mail, you can see ‘From’ tab and you can select “Other e-mail address…” on the account you have Send-As or Send on Behalf Of permissions.

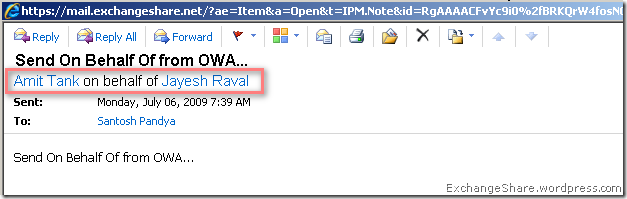
Send On Behalf Of : Let’s say I have Send On Behalf Of permission on Jayesh Raval, I selected it in From field and sending a mail to Santosh Pandya.

Santosh Pandya will see a mail from “Amit Tank on behalf of Jayesh Raval”.
Send As : Let’s say I have Send As permission on Nikunj Khunt, I selected it in From field and sending a mail to Santosh Pandya.

Santosh Pandya will see that mail came from Nikunj Knunt.

Now if you don’t have Send As or Send on Behalf of permission, of course Mail Tips gives you an error and doesn’t allow you to send mail like outlook.

Isn’t OWA 2010 a shadow of Outlook? Kudos to Exchange team for making such an immense product for us…!!


