Posts Tagged ‘OWA’
Exchange 2007: OWA Themes Selection
End-user can choose the OWA appearance from 4 different themes available by default in Exchange 2007 SP1.
Users need to go to, Options –> General Settings –> Appearance –> Select Anyone…
- Seattle Sky (Default OWA Theme)
- Carbon Black
- Xbox®
- Zune™

Q: What to do if this option is not visible in OWA?
A: This options is visible only if ThemeSelectionEnabled option enabled on OWA virtual directory. You can verify it with below cmdlet.
Get-OwaVirtualDirectory "owa (default web site)" | FL Name, ThemeSelectionEnabled

If value of ThemeSelectionEnable option shows False, you can set it to true with below cmdlet.
Set-OwaVirtualDirectory "owa (default web site)" –ThemeSelectionEnabled $True
Q: What to do if you want to force anyone of the theme globally for all users?
A: You can set the theme globally for all users with “DefaultTheme” parameter of Set-OwaVirtualDirectory cmdlet.
Question is how do we give the name of theme since powershell doesn’t support special character available in the name of themes, like Xbox® & Zune™. Instead of giving name of theme we can give the directory name of the theme where the files of a theme are located.
You can find all theme directories at “C:\Program Files\Microsoft\Exchange Server\ClientAccess\Owa\8.1.xxx.x\themes” (where xxx.x differs based on the SP & UR installed).
| Directory Name | Theme |
| Base | Seattle Sky |
| 1 | Carbon Black |
| 2 | Xbox® |
| 3 | Zune™ |
So we can pass the directory name in the “DefaultTheme” parameter of Set-OwaVirtualDirectory cmdlet to select the default theme globally. To select Xbox theme globally we can run below cmdlet and restart the IIS service to make it effective.
Set-OwaVirtualDirectory "owa (default web site)" -DefaultTheme 2 -ThemeSelectionEnabled $False
IISReset /NoForce

Q: What happens if we don’t disable Theme Selection while setting up specific theme globally?
A: You would have seen that I added a parameter “ThemeSelectionEnabled” with value $False to disable Theme Selection while setting up OWA theme globally.
If ThemeSelectionEnable option is set to $True while setting up OWA theme globally, it applies only on the users who login first time in OWA, and for the users who have already login, don’t see new theme applied and they need to choose from Options –> General Settings manually.
But ThemeSelectionEnable optionis set to $False, new theme applies to all users in the organization.
Default OWA Themes
 |
 |
 |
 |
|
Seattle Sky |
Carbon Black |
Xbox® |
Zune™ |
How to: Setup Read Only Mailbox in Exchange 2003/2007
 This is frequently asked question, “How to setup Read-only Mailbox?” or “How to give Read-Only permission to access mailbox?” in Exchange 2003/2007. Procedure is tricky but moderately possible.
We have two places where we can give minimum permission to access any mailbox. Refer below article at MS Exchange Team blog for more details.
Minimum permissions necessary to access mailbox data
- Active Directory Mailbox ACLs – Full Mailbox Permission requires in the mailbox ACLs at Active Directory level to access mails, so this is not correct place where we can configure Read-Only permission.
- MAPI Folder Permissions – This is the correct place for our requirement. Let’s discuss how to do so.
As always let’s take an example. I am owner of mailbox called “Support” mailbox and I have Full Mailbox Access on it. Now I want to share Support mailbox with any user or a set of users (in from of group) but as a Read-Only and don’t want to allow them deleting any items inside.
If you are selecting a group to configure permission then it should be Mail Enabled Security group. If you are using distribution group to assign permission then it gives you an error while assigning permission in Outlook. It is always recommended to use security group while assigning permissions.
Let’s say I am going use “#Support Team” Mail Enabled Security group to assigned read only permission on “Support” mailbox hence member of “#Support Team” will be able to open it.


Now to open any mailbox and view all folders inside it, we need to give MAPI permission starting from Top of the Mailbox object “Mailbox – <Mailbox Display Name>” in Outlook.
1. Right Click on “Mailbox – Support” and click “Change Sharing Permission…” (“Sharing…” if you are using Outlook 2003).

2. Click on Add and select “#Support Team” from GAL, give at least “Folder
Visible” (or you can also give Reviewer) permission to view all mailbox folders.

3. Now, Right click on “Inbox” and click on “Change Sharing Permission…” or “Sharing…”.

4. Click “Add” and select the “#Support Team” from GAL and give “Reviewer” permission.

Follow step 3 & 4 for all folders which you want to share with group.
Sheldon Labrooy is one of the member of “#Support Team”.

So Sheldon can add “Support” mailbox into Outlook profile by going to Tools –> Account Settings –> Change Email Account –> More Settings –> Advance Tab –> Click Add in “Mailboxes – Open these additional Mailboxes:” and select Support mailbox.


Sheldon can see all items available in Support mailbox and he will be able to Reply or Forward.

But he is not allowed to Delete or Move any items in it.

Its pretty simple to add and open any mailbox in Outlook but how to open it in OWA? Reason is OWA requires Full Mailbox access to open full content of OWA site, otherwise it gives an error telling that you don’t have permission to access mailbox, so what you can do in Read-Only mailbox case?
Sometime back I discussed how to open shared calendar in OWA and user can use same method here to open “Inbox” of any read only mailbox.
User can use below direct links for respective folders and give their own user id and password to open it in OWA.
| Inbox | https://<FQDN of server>/owa/<smtpaddress>/?cmd=contents |
| Subfolder of Inbox | https://<FQDN of server>/owa/<smtpaddress>/?cmd=contents&f=inbox%2fSubFolder |
| Calendar | https://<FQDN of server>/owa/<smtpaddress>/?cmd=contents&module=calendar |
| Contacts | https://<FQDN of server>/owa/<smtpaddress>/?cmd=contents&module=Contacts |
| Tasks | https://<FQDN of server>/owa/<smtpaddress>/?cmd=contents&module=Tasks |

Exchange 2010: ‘Send As’ and ‘Send on Behalf Of’ in OWA

As we know Exchange 2010 is coming with many wonderful new and improved features. Let me demonstrate one of the long awaited feature, “Send-As” or “Send on Behalf Of” in OWA..!!!
Before going forward, let me show you how to enable BCC and From fields in options.
Go to Options –> Settings –> Mail –> Message format and enable below option “Always Show From” and also if you want enable Bcc field to available always by default, select “Always Show Bcc”.

Yes, that’s true now you can keep Bcc option enabled by default in Exchange 2010 as opposed to enabling every time from “Options” while drafting a new mail in Exchange 2007 (however there is a workaround to keep it enabled by default in Exchange 2007).
Back to main topic, when you draft a new mail, you can see ‘From’ tab and you can select “Other e-mail address…” on the account you have Send-As or Send on Behalf Of permissions.

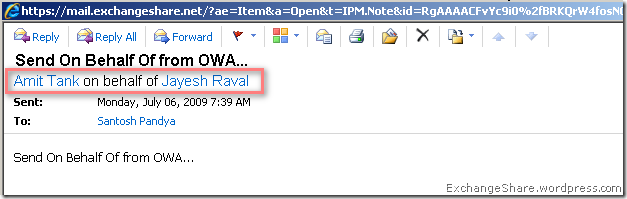
Send On Behalf Of : Let’s say I have Send On Behalf Of permission on Jayesh Raval, I selected it in From field and sending a mail to Santosh Pandya.

Santosh Pandya will see a mail from “Amit Tank on behalf of Jayesh Raval”.
Send As : Let’s say I have Send As permission on Nikunj Khunt, I selected it in From field and sending a mail to Santosh Pandya.

Santosh Pandya will see that mail came from Nikunj Knunt.

Now if you don’t have Send As or Send on Behalf of permission, of course Mail Tips gives you an error and doesn’t allow you to send mail like outlook.

Isn’t OWA 2010 a shadow of Outlook? Kudos to Exchange team for making such an immense product for us…!!
How To: Open Shared Calendar in OWA
 Sometime back I posted an article about how to “Give Calendar Read Permission on all Mailboxes” in your environment and anyone can open anybody’s calendar in Outlook easily if it is shared but how can anyone open in OWA? Let’s discuss the caveats in detail…
Let’s take an example, Sheldon Labrooy shared his calendar with me (Amit Tank) and I got a sharing invitation.

I can open his calendar by clicking on “Open this Calendar” button on top of the mail or with help of “Open a Shared Calendar”.

But there isn’t any option to open Sheldon Labrooy’s calendar in OWA.

If I try to open his mailbox in “Open Other Mailbox”,…

I got an error that you don’t have permission to open this mailbox.
Pretty clear, he has shared only Calendar folder of his mailbox but not Full Mailbox.

When we try to open somebody else’s mailbox in OWA, OWA main web page has all modules (Mailbox, Calendar, Tasks, Notes, other options etc) listed and Exchange tries to check full mailbox permission which we don’t have and get permission error.
Hummm, to open other’s mailbox in OWA we need to have explicit “Full Mailbox” permission on that mailbox, very well explained in below article.
How to Open Another User’s Calendar in Outlook Web Access
When user or admin shares a calendar, it gives “Reviewer” MAPI Folder permission on just Calendar folder.
So how do we open shared mailbox in OWA, what’s the hack?
Instead of opening main page of OWA why don’t we directly open just calendar module part, and here are the links to open just calendar in various views…
| Views | Links |
| Calendar View – Default – Daily | https://<server name>/owa/<SMTP address>/?cmd=contents&module=calendar |
| Calendar View – Daily | https://<server name>/owa/<SMTP address>/?cmd=contents&f=Calendar&view=Daily |
| Calendar View – Weekly | https://<server name>/owa/<SMTP address>/?cmd=contents&f=Calendar&view=Weekly |
| Calendar View – Daily – Specific Date by specifying Date, Month and Year | https://<server name>/owa/<SMTP address>/?cmd=contents&f=Calendar&view=Daily&d=3&m=7&y=2009
Where… d=[1-31] |
Let’s see all examples here…
https://Ess-Exch701/owa/Sheldon.Labrooy@ExchangeShare.info/?cmd=contents&module=calendar

https://Ess-Exch701/owa/Sheldon.Labrooy@ExchangeShare.info/?cmd=contents&module=calendar&view=Weekly


Exchange Update Rollup Installation. It is not Nightmare!!!
Many people feel that installation of Exchange Update Rollup is a nightmare, does it really? Well, It doesn’t, if you take certain steps of prevention.
Here are some of the myths which prevents from getting sleepless night for Update Rollups installation.
Known Issues & Pre Installation Checklist
1. Previous Interim Update (IU) Exists, Remove/Uninstall
Microsoft releases critical IUs for Exchange outside the Rollup schedule and can be obtained by contacting PSS. If you attempt to install the Rollup prior to removing the IU, you may get an error.
Prevention Step: Any installed IUs must be removed prior to applying a Rollup.
2. Permission Required
It is recommended to use the same account which was used to install Exchange server while installing Update Rollups.
If you have to use different account then make sure that you have highest permission like Exchange Organization Admin and a member of Local Admin group of Exchange server.
3. Do you have CAS-CAS Proxying deployed?
Apply the update rollup to the Internet-facing Client Access servers before you apply the update rollup to the non-Internet-facing Client Access servers.
4. Do you have Outlook Web Access customization?
When you apply an update rollup package, the update process will copy over the OWA files if it is necessary. If you have modified the Logon.aspx file or other OWA files, the customizations will be overwritten to ensure that OWA is updated correctly.
Prevention Step: Always make a backup copy of any customized Outlook Web Access files before you apply the update rollup.
After you apply the update rollup package, re-create Outlook Web Access customization in Logon.aspx.
5. Status of IPv6
Do you have IPv6 enabled in “Local Area Connection”? If you have IPv6 network and ticked/enabled in Local Area Connection, then it is fine.
But if you do NOT have IPv6 network and somehow unticked/disabled in Local Area Connection, follow below steps before Update Rollup installation.
- Enable IPv6 in Local Area Connection.
- Use Registry Editor and add registry key to completely disable IPv6 on a Windows Server 2008 computer as per KB952842
This may cause Exchange services to start or from changing ‘Startup Type’ (disabled to Automatic) after installation.
6. Lack of Internet Connectivity
You may experience long installation times and you may receive the following message:
“Creating Native images for .Net assemblies”
This issue occurs because the Exchange server issues network requests to connect to http://crl.microsoft.com/pki/crl/products/CodeSigPCA.crl and look up the certificate revocation list at NGEN time for each assembly that it compiles to native code.
Because the Exchange server is not connected to the Internet, each request must wait to timeout before moving on.
Prevention Step: Turn off the Check for publisher’s certificate revocation option on the server that is being upgraded. Follow these steps:
In Windows Internet Explorer –> Tools –> Internet Options –> Advanced tab
In the Security section, uncheck or clear the box for below tow options
“Check for publisher’s certificate revocation”
“Check for server certificate revocation”
It is considered safe to clear this security option in Internet Explorer if the computer is in a tightly controlled environment. After the setup has completed, turn on the Check for publisher’s certificate revocation option again

Further information can be found here…
Exchange 2007 managed services might time out during certificate revocation checks
http://msexchangeteam.com/archive/2008/07/08/449159.aspx
7. Managed code services may not start after you install this update rollup
This problem occurs because you do not have a Microsoft .NET Framework common language runtime (CLR) build that supports the generatePublisherEvidence configuration setting.
Prevention Step: If you are using the .NET Framework 2.0, install one of the following software updates:
.NET Framework 2.0 Service Pack 1
Problems that are fixed in the .NET Framework 2.0 Service Pack 1
Software update 936707 with CRL build 2.0.50727.876
FIX: A .NET Framework 2.0 managed application that has an Authenticode signature takes longer than usual to start
Software update 942027 with CRL build 2.0.50727.926
FIX: You may notice that the memory load is very high when you run an application that is built on the .NET Framework 2.0
Refrence: Exchange Server 2007 managed code services do not start after you install an update rollup for Exchange Server 2007
http://support.microsoft.com/kb/944752
8. Exchange Best Practice Analyzer
Run ExBPA regularly to find any misconfiguration, problems or standard recommendation from Microsoft on your Exchange environment.
It is also recommended to run it before installation UR and correct the errors if shows in result.
Troubleshooting Update Rollup Installation Failure
Now what if UR installation failed, where to start looking for the cause or reason behind failure?
The Exchange Software Updates forum is available to get assistance if you come across with any update rollups installation issue. Microsoft engineers monitor the forum and assist you, but what they need to troubleshoot the issue? Information on your Exchange environment, how you are installing update rollup, and errors come up in various log files. These all things gives you and them hints to get resolution while troubleshooting.
Here are some of the logs to start investigation.
- Look into Event Log for any error related to UR installation.
- Enable Verbose MSI Logging to generate setup log and look into it for any error.
- ServiceControl.log available at C:\ExchangeSetupLogs.
- UpdateOwa.log available at C:\ExchangeSetupLogs.
1. Look into Event Log for any error
This is the starting place of forensic lab :), you may see some MSI related or any other errors which might have some numbers and with it setup would have failed.
Here is an example…
Event Type: Error
Event Source: MsiInstaller
Event Category: None
Event ID: 1024
Description:
Product: Microsoft Exchange Server – Update ‘Update Rollup 8 for Exchange Server 2007 Service Pack 1 (KB968012) 8.1.375.2’ could not be installed. Error code 1603.
Windows Installer can create logs to help troubleshoot issues with installing software packages. Use the following link for instructions on turning on logging support: http://go.microsoft.com/fwlink/?LinkId=23127
Error code 1603 is pretty generic in MSI installation and to look further deep we need to enable verbose MSI logging. Question comes, how? Ok, let’s discuss it in next portion.
2. Enable Verbose MSI Logging to generate setup log
We can enable MSI verbose logging to get extensive details of update rollup installation with below switches…
Exchange2007-KB<kb # of Rollup>-x64-EN.msp /lxv* c:\LogName.log
Let’s take an example of Exchange 2007 SP1 UR8 which was released sometimes back. I am executing it with below command.
Exchange2007-KB968012-x64-EN.msp /lxv* c:\SP1UR8.log

This will generate extensive log of UR installation and log an activity of each and every step.

You can open this log and check for errors which may shed some light on why the installation failure occurred. If you create a thread at Exchange Software Updates forum or log a call with Microsoft PSS, they will ask for this file anyway.
3. ServiceControl.log available at C:\ExchangeSetupLogs
This file keeps the log of service ‘Status’ and ‘Startup Type’ changes happened by ServiceControl.ps1 script during UR installation.
We may find the cause of service, if stopped or disabled during UR installation.

4. UpdateOwa.log available at C:\ExchangeSetupLogs
This file keeps the log of OWA changes performed by UpdateOWA.ps1 during UR installation.

Here is an example of UpdateOwa.log file generated during successful UR8 installation but we may find the cause here if OWA comes up with errors after UR installation.

We can also find UpdateOWA.PS1 script under Program Files\Microsoft\Exchange Server\Bin directory which can be run to correct OWA errors came after UR installation.


